Introduction
This page was started as I remade my Windows 10 and Apache home web server in December 2019. I wanted to optimize and secure the Apache installation but I need to do the same to Windows 10 first.
The last time my web server "The Server in the Cellar" got a major overhaul was on January 16, 2016 when I purchased a Dell Inspiron 3847 and installed WAMPServer on it. In December 2019, I decided to upgrade the computer hardware and reinstall Windows 10 and the server software, this time installing plain Apache for Windows from Apache Haus.
As well as the Dell Inspiron 3847 desktop some of the screenshots come from an older Dell Inspiron 5559 laptop that has been in use for several years.
This page shows some of the tools and techniques that can be used to keep a computer running properly. Individually, unless there is something seriously wrong with a piece of hardware or software, there is not much of a difference in performance but collectively there should be.
Tip: Be very careful using some of these tools and techniques. Some of them can be very damaging to your computer and to repair it may involve a complete reinstall of the operating system. Ensure you have a complete backup of everything you do not want to lose!
Tip: Google, Bing, DuckDuckGo or whatever your favourite search engine is, are your friends. Before deleting or updating drivers, programs or processes ensure you are changing the correct one and that doing whatever you are doing is not going to effect the operation of your computer.
There are many ways of opening programs in Windows 10, but I usually prefer just to type what I want from the Windows Taskbar Search Box. Usually the first three or four letters will give me the program I am looking for.

Windows Taskbar Search Box
Reinstall Windows
Before I did anything I had to decide whether I wanted to do a complete clean install of Windows 10 or use one of the many disk mirroring tools to reinstall everything as it was on the new SSD. In the end I decided to do a complete, clean install of Windows 10. Once that was decided I made a complete backup of all the files I would want afterwards - the configuration files, user files, the website files - everything.
I would much rather have the physical media, but most people do not now get that when they purchase a Windows 10 machine anymore. That meant using the Microsoft Windows 10 Media Creation Tool to create a bootable USB drive. Once I'd downloaded the files, it was time to upgrade the computer hardware a little.
Hardware
The quickest and easiest hardware upgrades to improve performance are giving it more memory and changing from a traditional disk to a solid state drive (SSD).
Windows 10 64bit can run in just 2Gb of RAM but 4Gb will give better experience. I opt for 8Gb as a minimum nowadays and that's what the Dell Inspiron 3847 originally came with in 2016. This motherboard in the Dell can only support 16Gb of RAM otherwise I would have put 32Gb into it. Windows 10, 64bit, itself can address up to 2Tb of RAM. The reason I wanted to maximize on RAM is to be able to keep the most used web files in memory rather than keep reading them from disk. This is known as caching.
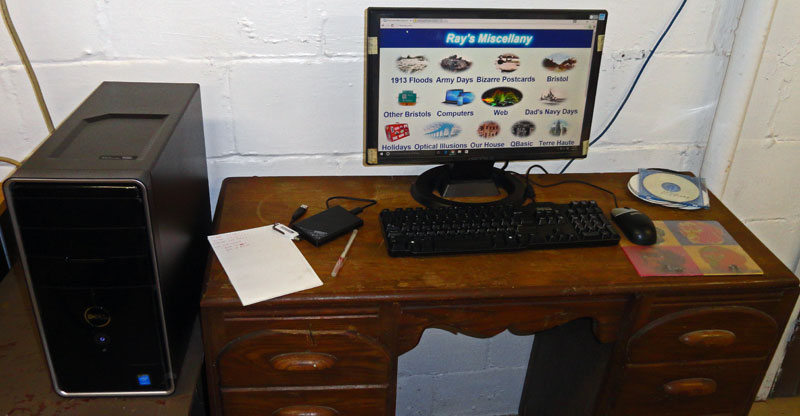
The "Server in the Cellar." My nice new Dell Inspiron 3847 on January 16, 2016
The Dell has an Intel i5-4460 @ 3.2GHz processor. In December 2019 it was upgraded from 8Gb to 16Gb RAM and the 1Tb hard drive replaced with a 1Tb SSD.
Windows has many methods of reporting information about itself but none are much good when it comes to ordering more memory. One of the best tools I've found for reporting the type of memory is the System Scanner from Crucial. This is a tiny program that opens the information you need in a browser window. You do not need to buy the memory from Crucial, but it does give the maximum amount of RAM your system can use and the type it needs.
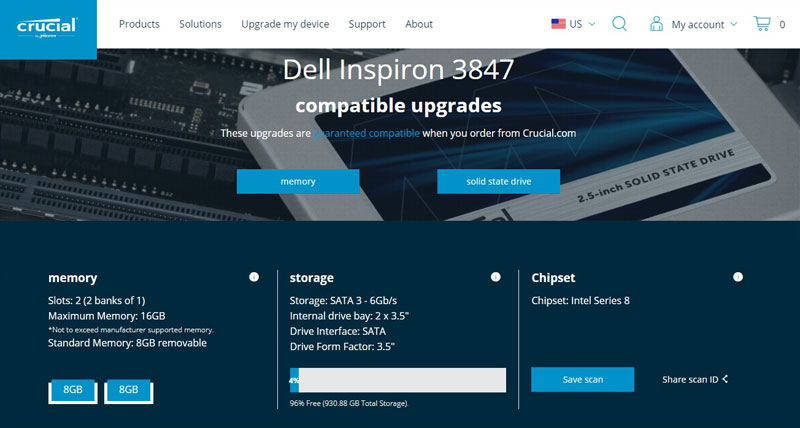
Crucial System Scan
Compatible memory will appear under this page header
The SSD was easier as the computer uses SATA 3. The original drive was a Seagate 1Tb 7200rpm ST1000DM003 which I replaced with a Samsung SSD.
In the end I bought and installed the Crucial 16GB Kit (8GBx2) DDR3L 1600 MT/s (PC3L-12800) Unbuffered UDIMM Memory CT2K102464BD160B RAM and a Samsung SSD 860 EVO 1TB 2.5 Inch SATA III Internal SSD (MZ-76E1T0B/AM) from Amazon.
The average read/write speed of the Seagate HHD was 156Mb/s and around 300 IOPS (Input/Output Operations Per Second) compared to over 500Mb/s and over 90,000 IOPS with Samsung's SSD.
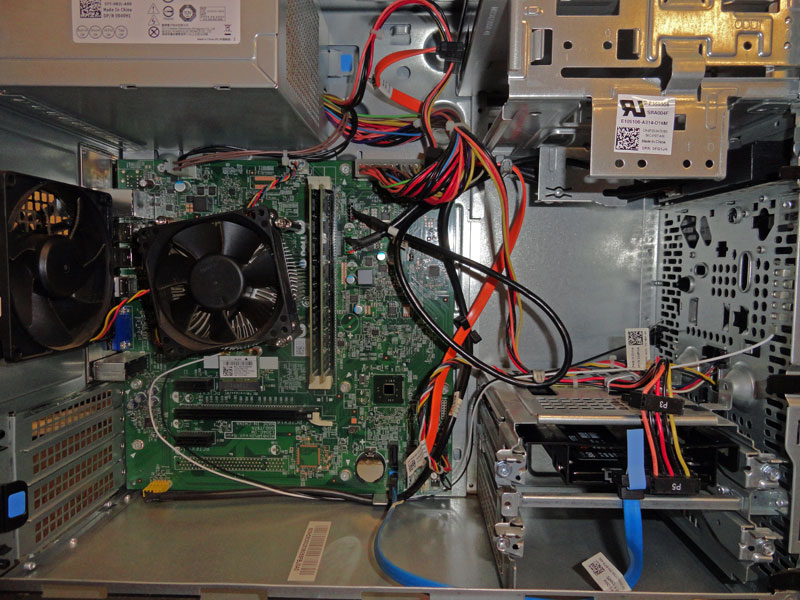
The "Server in the Cellar," the Dell Inspiron 3847 during the RAM and SSD upgrade on December 26, 2019
The computer BIOS was already set to boot from a USB device first and the installation went surprisingly well. It took less than an hour to download the files and install them on my new SSD.
Information, Monitoring & Maintenance Tools
There are any number of diagnostics, performance monitors and stress testing tools around such as CPUID, CrystalMark, HeavyLoad, Moo0, Novabench, Rainmeter, RWEverything, Sandra, SolarWinds, Speccy, UserBenchmark, WinAudit, Wise System Monitor, and Zabbix.
Windows also has its own tools such as Computer Management, Device Manager, Disk Cleanup, Event Viewer, Microsoft Management Console (MMC), MSConfig, Performance Monitor, Reliability Monitor, Resource Monitor, System Information, Task Manager, WinSAT as well as the 70 tools known collectively as Windows Sysinternals.
This page will use the Windows tools to get information about the computer and the operating system and to optimize Windows 10.
Right clicking on the Windows Start icon or pressing the Windows key + X, brings up a useful tools menu
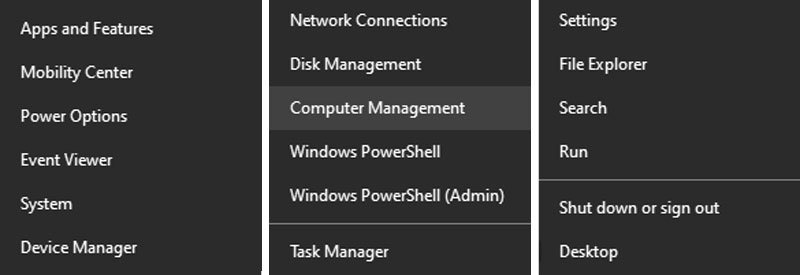
Windows Tools menu
Here seen split into three, just to display it
Computer Management is exactly that. It is a console that hosts various administrative and managemeent programs or snap-ins. It can also be opened from Windows Settings or from the command using Computer Management or compmgmt in the Windows Taskbar Search box or a command prompt.
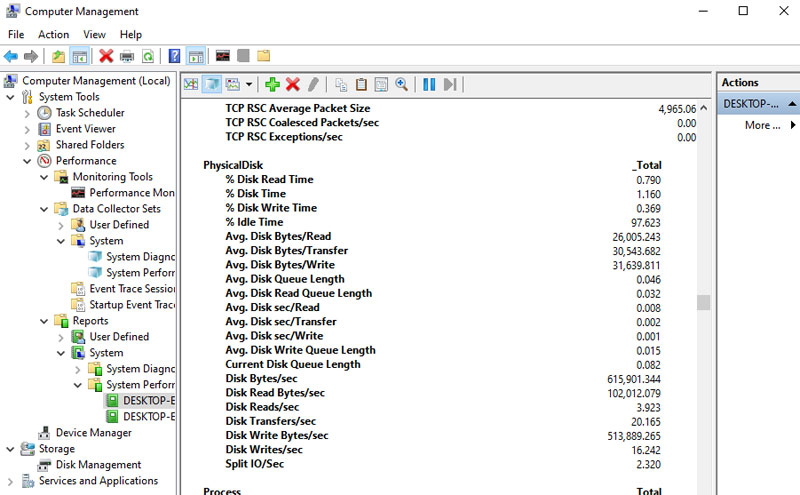
Computer Management
Microsoft Management Console (MMC)
Computer Management provides a useful set of tools to inspect and control various aspects of Windows 10. For example, a report of the computer's performance can be gotten by, in the left-hand "Console Tree" pane, open System Tools > Performance > Data Collector Sets > System. Right click on "System Perfomance" and choose "Start" from the menu. It takes about a minute to run and the final report can be found in System Tools > Performance > Reports > System > System Performance. The report can be viewed in various graphical formats or as text.
Computer Management is actually snap-in (.msc file extension) for the Microsoft Management Console (MMC). To open the MMC type MMC into the Windows Taskbar Search box or a command prompt. The console is initially empty but snap-ins can be added by going to the File > Add/Remove Snap-in... A list of the available snap-ins will appear and these can be added or removed from the console.
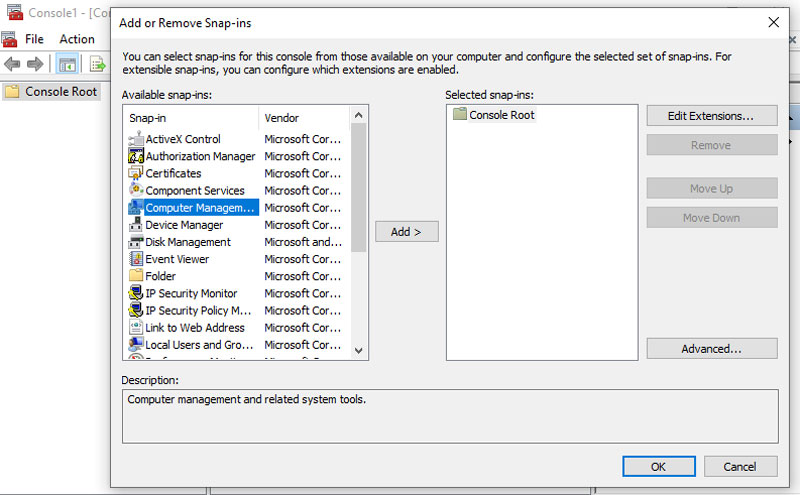
MMC - Adding or removing snap-ins
How the MMC actually works is not simple but it is a container for the snap-ins that provide useful information and allow aspects of the computer to be changed. Windows 10 uses MMC v3 but just before version 2 was launched in 2001, Michael Chacon wrote two posts in Redmond that sum up MMC beautifully and which are still relevant. COMmon Ground is a general overview of the MMC while The Beauty of the MMC describes the MMC, its snap-ins, extensions that add functionality to a snap-in and Taskpads. slightly newer is Create and Save a Custom Console by Using Microsoft Management Console (MMC) on Microsoft's Technet while Microsoft Management Console 3.0 is meant more for MSC developers.
The .msc files are usully located in the windows\system32 directory. To list them at a command prompt then dir c:\windows\system32\*.msc /b can be used. If using PowerShell then use dir c:\windows\system32\*.msc -name or Get-ChildItem -path c:\windows\system32\*.msc -name or Get-ChildItem -path c:\windows\system32\* -include *.msc -name or you can replace "Get-ChildItem" with "GCI". For more information see Get-ChildItem in Microsoft Docs.
The following only lists the ones on my computers:
| Filename |
Name |
Notes |
| |
ActiveX Control |
Enables the addition of an MMC node with a results view containing an ActiveX control. |
| |
Folder |
Adds a folder to the Document tree in MMC. Used for housekeeping purposes. |
| |
IP Security Monitor |
Monitors the Internet Protocol Security status |
| |
IP Security Policy Manager |
Manage Internet Protocol Security policies for secure communication with other computers. |
| |
Link to Web Address |
Allows the addition of a webpage to the MMC results window. This could link to a help or download page for example. |
| |
Security Configuration and Analysis |
Provides security configuration and analysis for Windows computers using security template files. |
| |
Security Template |
Editor for the security templates use for the Security Configuration and Analysis snap-in |
| azman.msc |
Authorization Manager |
Allows the setting of role-based permissions for Authorization Manager-enabled applications. It enables the mapping of users to roles. |
| certlm.msc |
Certificates |
Certificates help secure Windows 10. They are used for identification and securing data and communications. Certlm are for the local machine only. |
| certmgr.msc |
Certificates |
Certificates help secure Windows 10. They are used for identification and securing data and communications. Certmgr are for the current user only. |
| comexp.msc |
Component Services |
Component Services (COM+) management tool. This also loads the Event Viewer (eventvwr.msc) to view system and software logs and Services (services.msc) to view and control services. |
| devmgmt.msc |
Device Manager |
View and manage device hardware settings and driver software installed on the computer. |
| DevModeRunAsUserConfig.msc |
Local Computer Policy |
Complete customization of the start menu items and the taskbar. (MMC reports "MMC could not create the snap-in" on my laptop). |
| diskmgmt.msc |
Disk Management |
Allows setting up a new drive, changing partition and volume sizes, and changing a drive letter. |
| eventvwr.msc |
Event Viewer |
View system and software logs |
| fsmgmt.msc |
Shared Folders |
Shows shared folders and files |
| lusrmgr.msc |
Local Users and Groups |
Manages Local Users and Groups. Not available on my laptop which uses the User Accounts tool in the Control Panel |
| perfmon.msc |
Performance Monitor |
This also loads the Data Collection Sets which includes the System Diagnostics and System Performance tests and it also loads their reports. |
| services.msc |
Services |
Start, Stop and Restart Windows services |
| taskschd.msc |
Task Scheduler |
Manage timed tasks |
| tpm.msc |
Trusted Platform Module (TPM) Management |
The Trusted Platform Module (TPM) provides enhanced security. TPM is hardware-based, security-related functions. A TPM chip is a secure crypto-processor that is designed to carry out cryptographic operations. |
| WF.msc |
Windows Defender Firewall with Advanced Security |
Configures the Windows Defender Firewall. This also includes the Internet Protocol Security (IPsec) MMCs. |
| WmiMgmt.msc |
Windows Management Instrumentation |
Now depreciated in favour of DISM (Deployment Image Servicing and Management). |
Control Panel & Settings
Rather than have to open and look through the Control Panel to change settings it is often easier just to type whatever you're looking for in the Taskbar Search box. Typing display for example gives the following options:
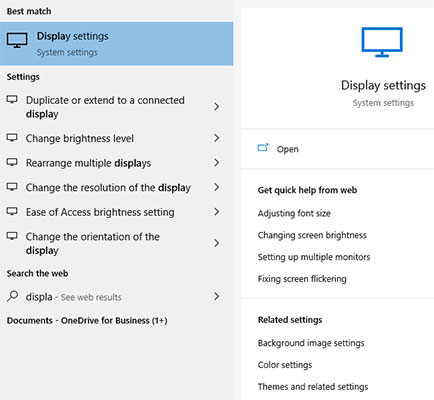
Searching for display settings
Some, but nowhere near all, Control Panel settings can be started using .cpl files. The .cpl files like the .msc files above are usually located in the windows\system32 directory. To list them at a command prompt then dir c:\windows\system32\*.cpl /b can be used. If using PowerShell then use dir c:\windows\system32\*.cpl -name or Get-ChildItem -path c:\windows\system32\*.cpl -name or Get-ChildItem -path c:\windows\system32\* -include *.cpl -name or you can replace "Get-ChildItem" with "GCI". For more information see Get-ChildItem in Microsoft Docs.
The following only lists the ones on my computers:
| Filename |
Panel |
Notes |
| appwiz.cpl |
Programs > Programs and Features |
View, repair or uninstall installed programs |
| bthprops.cpl |
Devices > Bluetooth and other devices |
Turn Bluetooth on and off. View attached USB devices |
| desk.cpl |
System > Display |
Display settings |
| Firewall.cpl |
System and Security > Windows Defender Firewall |
Manage Windows Defender Firewall |
| hdwwiz.cpl |
Device Manager |
View and manage device hardware settings and driver software installed on the computer. |
| igfxCPL.cpl |
Intel UHD Grpahics |
Shows system information and can change graphics settings |
| inetcpl.cpl |
Internet Properties |
Internet Explorer options |
| intl.cpl |
Region |
Windows 10 regional language and date/time settings |
| irprops.cpl |
Bluetooth Authentication Agent |
service
This is not user settable but instead runs the Bluetooth Authentication Agent service |
| joy.cpl |
Game Conrollers |
Sets the installed game controllers |
| main.cpl |
Mouse Properties |
Touchpad and mouse control settings |
| mmsys.cpl |
Sound |
Audio settings, system sounds, speaker and microphone selectors |
| ncpa.cpl |
Network and Internet > Network Connections |
Ethernet and wireless connection settings |
| powercfg.cpl |
Hardware and Sound > Power Options |
Computer power and performance settings |
| RTSnMg64.cpl |
Realtek HD Audio Sound Effect Manager |
|
| sysdm.cpl |
System Properties |
System properties and settings. Computer name, workgroup, Device Manager, Windows visual effects, recovery, restore points, remote assistance and more |
| TabletPC.cpl |
Tablet and pen settings |
|
| telephon.cpl |
Location Information |
This is for telephone or modem connections and allows the setting of carrier and area codes |
| timedate.cpl |
Date and Time |
Change the time zone, date and time |
| wscui.cpl |
System and Security > Security and Maintenance |
Firewall, anti-virus, User Account Control (UAC), maintenance tasks, problem reports, reliability reports, drive status, device drivers, system recovery and more |
There's a method using PowerShell to list the available Control Panel items and that is by opening PowerShell and typing Get-ControlPanelItem at the prompt.
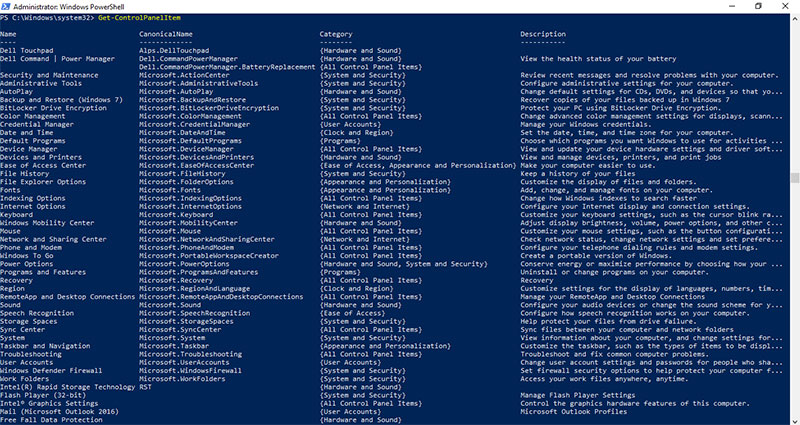
PowerShell listing of Control Panel items
Depending on the size of the PowerShell window one ofthe four columns, Name, CanonicalName, Category, and Description may not appear or be truncated. To force wrapping of truncated columns use Get-ControlPanelItem | Format-Table -wrap
The Control Panel items listed in Powershell can be run using Show-ControlPanelItem -Name [name] or Show-ControlPanelItem -CanonicalName [canonicalName]
The documentation can be found for Get-ControlPanelItem and Show-ControlPanelItem in the PowerShell documentation.
Device Drivers
Windows has a tool to help find problems with devices and their drivers. A driver is a piece of software that allows the operating system to interact with attached hardware. Windows has Device Manager which lists the computer devices and controls their drivers. It will also show drivers that are not functioning properly. Device manager is part of the Computer Management Console.
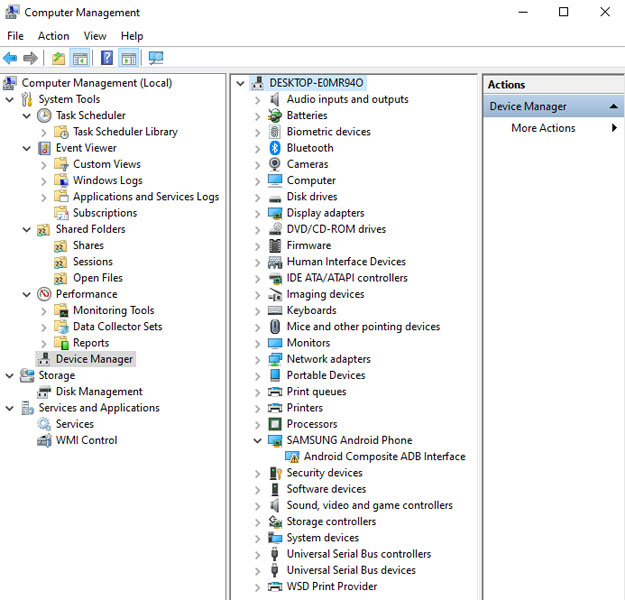
Device Manager open in the Computer Management Console
Device Manager can be started on it's own from the Windows Taskbar Search box by entering device manager.
Device manager may not show all the system's devices as some are hidden.To view those, click on "View" in the toolbar and check "Show hidden devices".
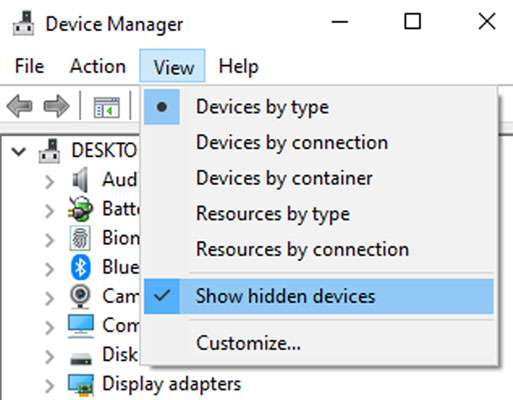
Device Manager: Showing hidden devices
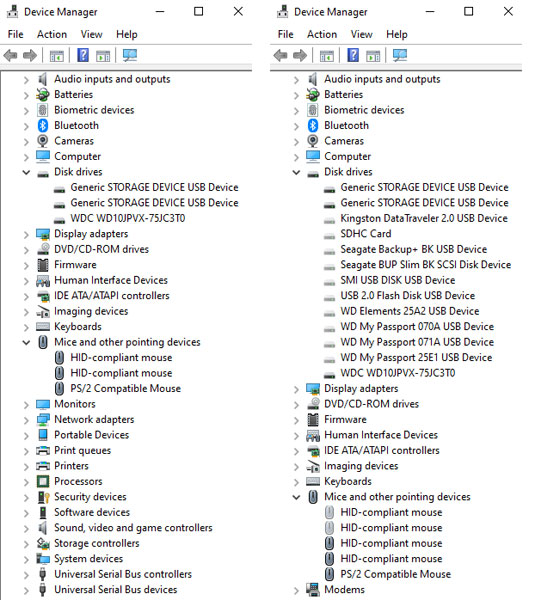
Device Manager: The difference between hidden and non-hidden devices
When "Show hidden devices" is checked Device Manager shows hidden system drivers and the drivers for devices that are not currently connected to the computer. These are sometimes referred to as "ghost" devices as their icons appear in lighter colours than the others. In the above screenshot can be seen the different USB drives and mice that have been attached to the computer over time.
Drivers that Windows has a problem with are marked with an explamation point inside a yellow triangle:
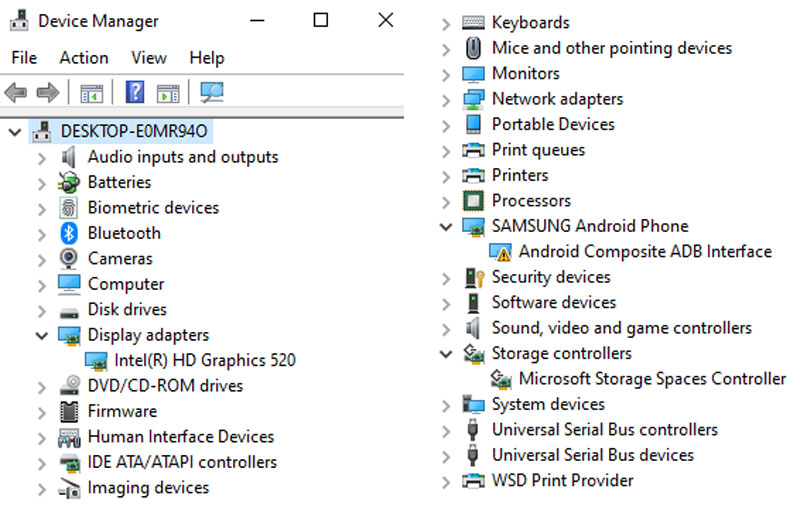
Device Manager with open problem devices
which have an explamation point inside a yellow triangle
The display has been split for convenience
From the list of devices I am particularly interested in old devices and their drivers, drivers that have some sort of problem and devices that are under a category named "Other devices" if there are any. The last of these refer to devices that Windows cannot identify properly or that do not need drivers.
Right clicking on any device will bring up a new menu giving various options for that device and its driver.
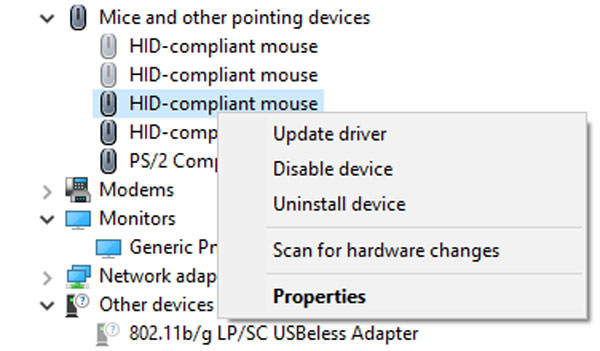
Device Manager: Device right click menu
Some devices witll not have one or more of these options
Going through the list of my devices, I do not want to do anything with the drivers for the hidden disk drive entries. Although they are not attached, the drivers are for my commonly used USB drives. As these are used fairly often I don't want to have to reinstall the drivers the next time I use one of them. The old mice drivers are different matter, and those were uninstalled using the "Uninstall device" menu option. I also removed other old devices such as some of the Bluetooth ones I have used.
Some problem devices can be repaired by choosing "Update driver". Clicking on this brings up a dialog box asking if Device Manager should look for a better driver or if you want to install one from a location you specify.

Device Manager: Updating a driver dialog
Unless the hardware manufacturer specifically says to install a certain driver, letting Device Manager look for the driver itself is usually the best option. Windows does not just search for the latest drivers, according to Microsoft's Where Windows Searches for Drivers, Windows first looks in the Driver Store and then Windows Update. It does not simply look for the latest driver, it tries to identify the best driver for the device.
Sometimes installing a new driver for one device clears problems for another because the two drivers had some sort of conflict.
When troubleshooting devices a lot of information about a device and its drivers can be found by clicking on the "Properties" item of this menu. One of the most useful items is under the Details tab. There is a drop down in that named "Property" and scrolling through that there is an item named "Hardware Ids". Every device added to computer has a unique hardware ID. If a device is otherwise unidentifiable then entering this ID into your favourite search engine should return information about the device and its driver.
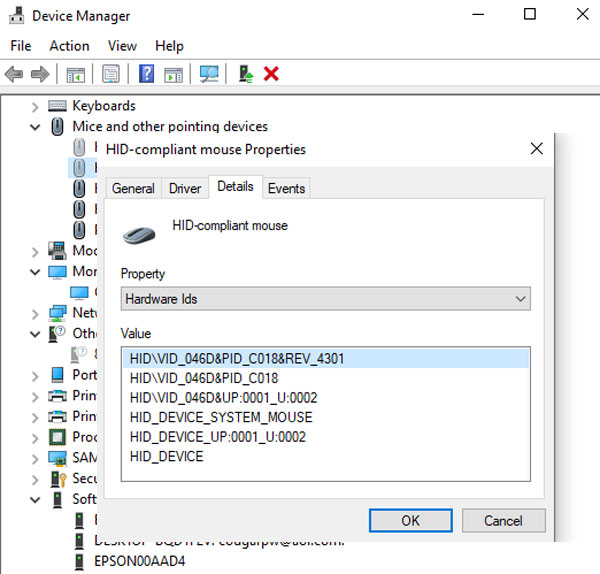
Device Manager, Properties > Details > Hardware Id
Sometimes a new driver may not work as expected. Many devices allow their drivers to be rolled back to an older version. To do this go to Properties for the device in Device Manager and then the Driver tab for that device.Click on "Roll Back Driver".
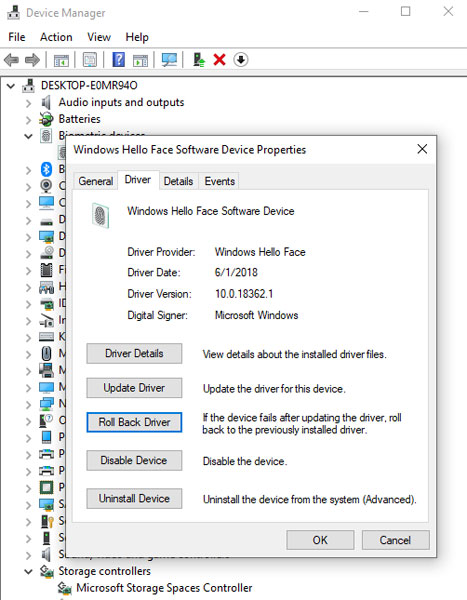
Device Manager, Properties > Driver > Roll Back Driver
I am now confident that most, if not all, of the unwanted device drivers have been removed and that the ones remaining are using the best drivers that can be found.
There are sites that keep their own store of drivers, but still my my most trusted sources are Device Manager, Windows Update, the computer manufacturer's site and the device manufacturer's sites.
WinSAT
In 2006, Microsft introduce the Windows Vista operating system. That contained the Windows Experience Index (WEI) score. This was the score after a series of tests had been run on the computer hardware. The tests were run against the processor, memory, 2D graphics, 3D graphics, and disk. Each had its own score and the final result, which was the lowest score for any of the tests, was the WEI for that hardware. The idea being to have a standard test that could compare different computers and to show which component would best to upgrade to improve the score for any particular machine. For example, if a computer had a low score for memory, then that would probably be the best component to upgrade first.
The score was not generally available starting from Windows 8, but the tool that ran the tests, WinSAT, is still available in Windows 10. It no longer tests for 3D graphics, which is mostly used for gaming, and automatically returns a score of 9.9 for that no matter what the actually capability is.
WinSAT can be run from a command prompt using winsat formal
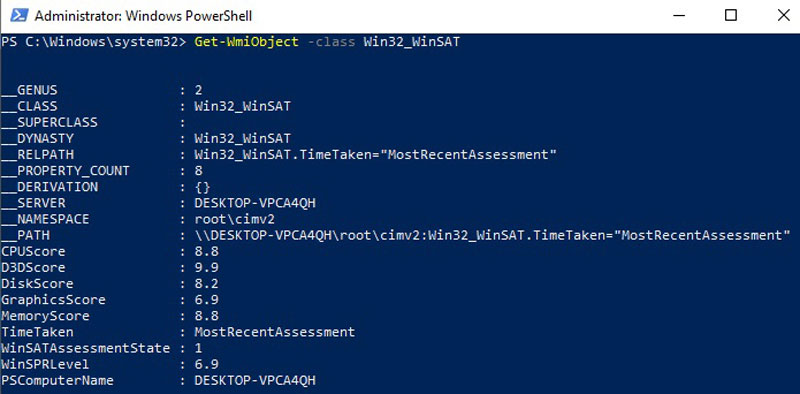
Another method for accessing WinSAT is by using PowerShell. To open PowerShell type powershell into the Taskbar Search box. Once PowerShell is open, type Get-WmiObject -class Win32_WinSAT at the prompt.
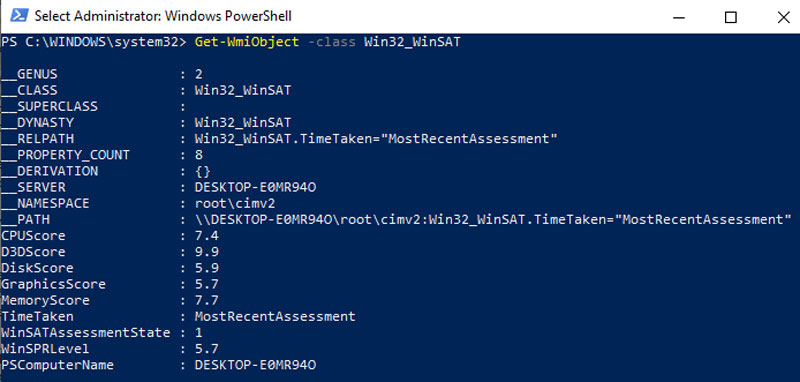
WinSAT score: Dell Inspiron 5559 laptop (above) and Dell Inspiron 3847 desktop (below)
Windows is very good at managing memory and will use as much RAM as it needs and is available which is why adding more is always a good idea but the cost / performance ratio drops after around 16Gb. You can always see how much memory is being used by opening the Task Manager. Press the Ctrl, Alt and Esc keys together or press the Windows key and X together and choose Task Manager from the menu or type Task into theTaskbar search box. Once Task Manager is open click on the "Performance" tab and then "Memory" from the list.
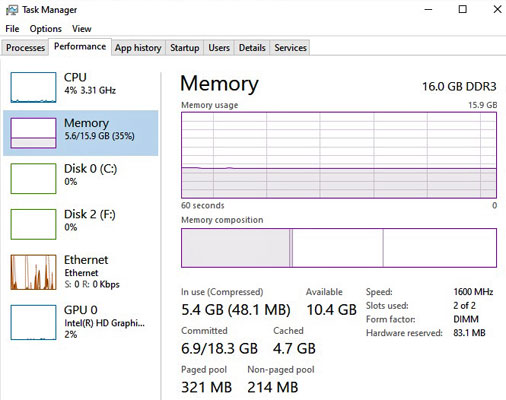
Memory usage in Task Manager
Unwanted Software
Windows 10 comes with several programs and utilities that a lot of people do not want and commonly refer to them as bloatware or crapware. At best these programs use a little disk space and at worst degrade system performance by running in the background or starting unwanted services using both CPU and memory.
As usual in Windows, there are several methods of uninstalling apps and programs. One way is to open the Start menu and right-clicking on any menu item or tile. If it is possible, one of the menu choices that appears will be "Uninstall."
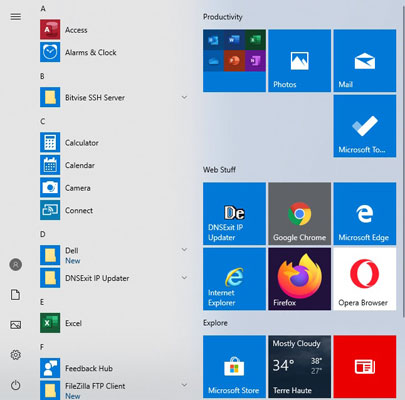
Windows 10 Start menu
Another method is to type Apps into the taskbar search bar and open Apps & features.
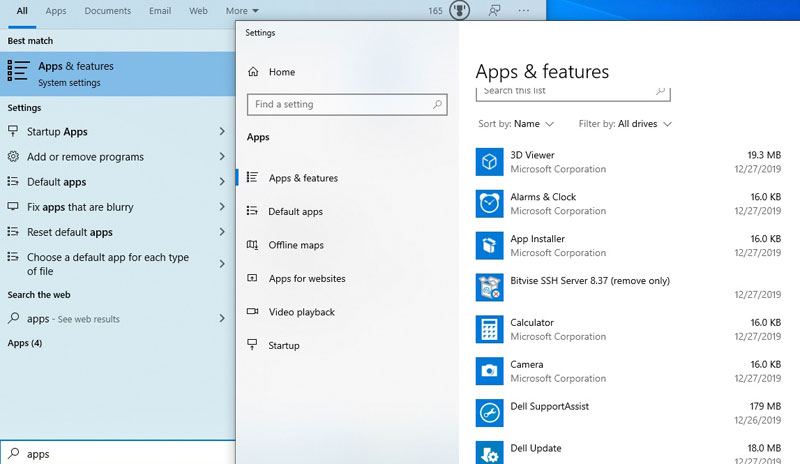
Opening Apps & features
Clicking on most of the entries will open a dialog box allowing you to uninstall it.
A third method is to use PowerShell. In the taskbar search bar type powershell, from the menu that appears select Powershell and Run as Administrator.

Starting PowerShell
You may also see links to PowerShell ISE (Integrated Scripting Environment) which is an editor for PowerShell scripts. At the command prompt in PowerShell type
get-appxpackage -allusers | select name, packagefullname | sort name
Here's what the command does:
get-apxpackage - returns a list of all apps installed under your user profile that use APPX and the newer MSIX packages that were introduced in October 2018. This is not the same as all installed programs which needs a PowerShell script rather than a simple command.
-allusers - get all the appxpackages for all user accounts on the computer
| - this is a pipe as used in the command line. It takes the output of one command and and uses it as the input of another.
select name, packagefullname - PowerShell is object orientated. That means each object can have its own objects, properties and methods. Select allows the choice of just a few of these to be displayed. In this case, get-appxpackage returns all of the properties of the package, the two were are interested in are the name of the package and its packagefullname which is needed to remove it.
sort name - Sorts the output of the select command using the name property.
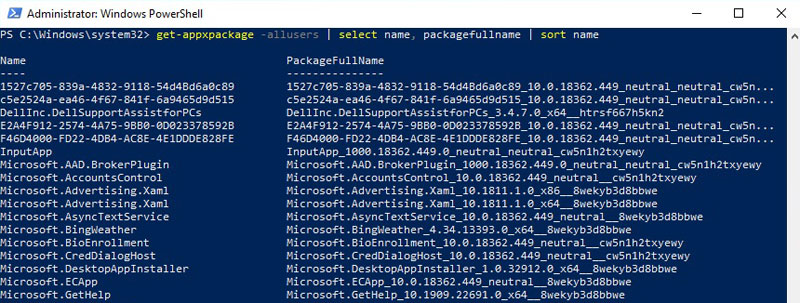
Results from get-appxpackage -allusers | select name, packagefullname | sort name
To uninstall one of the packages type:
Remove-AppxPackage -Package "packagefullname" -allusers
or
Get-AppxPackage "packagefullname" | Remove-AppxPackage -allusers
for example:
Remove-AppxPackage -Package "Microsoft.Microsoft3DViewer_7.1908.9012.0_x64__8wekyb3d8bbwe" -allusers
Tip: Be very careful when using PowerShell for tasks like this, you can wreck your computer system very easily and the only way of repairing it is a complete reinstall. get-appxpackage also lists all the installed system packages which you do not want to remove. Instead you could use Get-AppxProvisionedPackage which lists the provisioned ones. See the article "Understand the different apps included in Windows 10" in Microsoft Docs.
Full documentation for PowerShell can be found on Microsoft's PowerShell pages.
Why use PowerShell and not CMD? Windows 10 was released on July 29, 2015, and a year later Microsoft announced that the command prompt was being depreciated in favour of PowerShell and utilities such as WMIC (Windows Management Instrumentation Console) in favour of DISM (Deployment Image Servicing and Management). The older programs are still very much alive but no longer being being updated.
This page created January 3, 2020; last modified January 26, 2020